
Google Apps Script is a powerful tool for automating workflows, integrating APIs, and enhancing productivity within Google Workspace applications. In this blog post, we’ll explore five beginner-friendly projects demonstrating how to work with APIs using Apps Script. These projects will teach you how to send GET and POST requests, handle JSON and XML data, authenticate API requests, and update Google Sheets with external data.
📌 Project 1: Simple GET Request to Retrieve JSON Data
Objective: Learn how to fetch data from a public API using UrlFetchApp.fetch() and parse JSON responses.
Steps:
- Open a new Google Apps Script project.
- Replace the placeholder URL with a public API endpoint that returns JSON.
- Run the function and check the execution logs (
View → Logs) for the parsed output.
Code:
javascriptCopyEditfunction getData(){
  const url = 'https://jsonplaceholder.typicode.com/posts/1';
  const response = UrlFetchApp.fetch(url);
  const jsonData = JSON.parse(response.getContentText());

  Logger.log(response);
  Logger.log(jsonData);
}
Explanation:
- The function makes a GET request to an API endpoint that returns a JSON response.
- The JSON response is parsed and logged for further use.
📌 Project 2: POST Request to Send Data to an API
Objective: Learn how to send data to an API using a POST request.
Steps:
- Open your Apps Script project.
- Create a JSON object representing your data.
- Configure the request options (method, content type, and payload).
- Execute the request and view the response in the logs.
Code:
javascriptCopyEditfunction postAPI(){
  const url = 'https://jsonplaceholder.typicode.com/posts';
  const payload = {
    title: 'foo',
    body: 'bar',
    userId: 1
  };

  const options = {
    method: 'post',
    contentType: 'application/json',
    payload: JSON.stringify(payload)
  };

  const response = UrlFetchApp.fetch(url, options);

  Logger.log(response);
  Logger.log(response.getContentText());
}
Explanation:
- This function sends a POST request to an API with a JSON payload.
- The response is logged, showing confirmation of data submission.
📌 Project 3: Fetching and Parsing XML Data
Objective: Fetch XML data from an external URL and parse it using Google Apps Script’s XmlService.
Steps:
- Use
UrlFetchApp.fetch()to retrieve XML data. - Parse the XML string using
XmlService.parse(). - Access elements and log desired values.
Code:
javascriptCopyEditfunction fetchXML(){
  const url = 'https://www.w3schools.com/xml/simple.xml';
  const response = UrlFetchApp.fetch(url);
  const xmlContent = response.getContentText();

  const doc = XmlService.parse(xmlContent);
  const root = doc.getRootElement();
  const children = root.getChildren();

  children.forEach(function(child){
    Logger.log(`Child Element: ${child}`);
  });

  Logger.log(children);
  Logger.log(xmlContent);
}
Explanation:
- This function retrieves XML data and parses it to extract useful information.
📌 Project 4: GET Request with API Key Authentication
Objective: Learn how to include headers (such as an API key) when making a GET request.
Steps:
- Set up your API endpoint and acquire an API key.
- Create a headers object containing authentication information.
- Pass the headers in the
optionsobject ofUrlFetchApp.fetch().
Code:
javascriptCopyEditfunction getWithApiKey(){
  const url = 'https://api.example.com/data';
  const apiKey = 'YOUR_API_KEY_HERE';

  const headers = {
    'Authorization': 'Bearer ' + apiKey
  };

  const options = {
    headers: headers,
    muteHttpExceptions: true
  };

  const response = UrlFetchApp.fetch(url, options);

  Logger.log(response.getContentText());
}
Explanation:
- This function sends an authenticated request using an API key.
📌 Project 5: Updating Google Sheets with Data from an External API
Objective: Fetch data from an external API and update a Google Sheet.
Steps:
- Open or create a Google Sheet and attach your Apps Script project.
- Fetch data from a public API.
- Clear existing sheet content and write new data.
Code:
javascriptCopyEditconst SHEETID = '1o6Twh****PcCkPWZ4k';
const URL = 'https://jsonplaceholder.typicode.com/users';

function updateSheet() {
  const response = UrlFetchApp.fetch(URL);
  const data = JSON.parse(response.getContentText());
  const sheet = SpreadsheetApp.openById(SHEETID).getSheetByName('Sheet1');

  sheet.clearContents();

  if (data.length > 0) {
    const headers = Object.keys(data[0]);
    sheet.appendRow(headers);

    data.forEach(function (item) {
      const row = headers.map(function (header) {
        return item[header];
      });
      sheet.appendRow(row);
    });

    Logger.log('Updated');
  } else {
    Logger.log('Error');
  }
}
Explanation:
- This script retrieves data from an API and updates a Google Sheet with structured information.
🎯 Conclusion
These projects provide a solid foundation for working with APIs in Google Apps Script. Whether you’re fetching data, sending requests, parsing XML, or integrating Google Sheets, these scripts can be expanded and customized for real-world applications.
📌 Next Steps:
- Experiment with different public APIs.
- Add error handling to your scripts.
- Schedule these scripts using triggers to automate data retrieval.
Stay tuned for more hands-on Google Apps Script tutorials! 🚀
Project 1: Simple GET Request to Retrieve JSON Data

Description:
This project demonstrates how to perform a simple GET request to a public API that returns JSON data. You’ll learn how to use URLFetchApp.fetch(), parse the JSON response, and log the results.
Steps:
- Open a new Google Apps Script project.
- Replace the placeholder URL with a public API endpoint that returns JSON.
- Run the function and check the execution logs (via View → Logs) to see the parsed output.
Code:
function getData(){
const url = ‘https://jsonplaceholder.typicode.com/posts/1’;
const response = UrlFetchApp.fetch(url);
const jsonData = JSON.parse(response.getContentText());
Logger.log(response);
Logger.log(jsonData);
}
Project 2: POST Request to Send Data to an API

Description:
Learn how to send data to an API using a POST request. In this example, we’ll create a JSON payload and send it to a sample endpoint.
Steps:
- Open your Apps Script project.
- Create a JSON object representing your data.
- Configure the request options to include the method, content type, and payload.
- Execute the request and view the response in the logs.
Code:
function postAPI(){
const url = ‘https://jsonplaceholder.typicode.com/posts’;
const payload = {
title: ‘foo’,
body: ‘bar’,
userId: 1
};
const options = {
method: ‘post’,
contentType: ‘application/json’,
payload: JSON.stringify(payload)
};
const response = UrlFetchApp.fetch(url,options);
Logger.log(response);
Logger.log(response.getContentText());
}
Project 3: Fetching and Parsing XML Data

Description:
This project shows how to fetch XML data from an external URL and parse it using Google Apps Script’s XmlService. You’ll extract elements from the XML and log the results.
Steps:
- Create a new script in your Apps Script project.
- Use URLFetchApp.fetch() to retrieve XML data.
- Parse the XML string using XmlService.parse().
- Access elements and log desired values.
Code:
function fetchXML(){
const url = ‘https://www.w3schools.com/xml/simple.xml’;
const response = UrlFetchApp.fetch(url);
const xmlContent = response.getContentText();
const doc = XmlService.parse(xmlContent);
const root = doc.getRootElement();
const children = root.getChildren();
children.forEach(function(child){
Logger.log(`Child Element ${child}`);
})
Logger.log(children);
Logger.log(xmlContent);
}
Project 4: GET Request with API Key Authentication
Description:
Learn how to include headers (such as an API key) when making a GET request. This is useful when you need to authenticate your requests.
Steps:
- Set up your API endpoint and acquire an API key.
- Create a headers object containing your authentication information.
- Pass the headers in the options object of UrlFetchApp.fetch().
Code:
function getWithApiKey(){
const url = ‘https://api.example.com/data’;
const apiKey = ‘YOUR_API_KEY_HERE’;
const headers = {
‘Authorization’ : ‘Bearer ‘+apiKey
}
const options = {
headers: headers,
muteHttpExceptions: true
}
const response = UrlFetchApp.fetch(url,options);
Logger.log(response.getContentText());
}
Project 5: Updating Google Sheets with Data from an External API

Description:
This project demonstrates how to fetch data from an external API and update a Google Sheet with the retrieved information. It’s a great way to integrate live data into your spreadsheets.
Steps:
- Open or create a Google Sheet and attach your Apps Script project.
- Fetch data from a public API.
- Clear existing sheet content and write new data.
- Log the process for debugging.
Code:
const SHEETID = ‘1o6Twh****PcCkPWZ4k’;
const URL = ‘https://jsonplaceholder.typicode.com/users’;
function updateSheet() {
const response = UrlFetchApp.fetch(URL);
const data = JSON.parse(response.getContentText());
const sheet = SpreadsheetApp.openById(SHEETID).getSheetByName(‘Sheet1’);
sheet.clearContents();
if (data.length > 0) {
const headers = Object.keys(data[0]);
sheet.appendRow(headers);
data.forEach(function (item) {
const row = headers.map(function (header) {
return item[header];
})
sheet.appendRow(row);
})
Logger.log(‘Updated’);
} else {
Logger.log(‘Error’);
}
}
Coding Exercises
Personal Finance Advisor
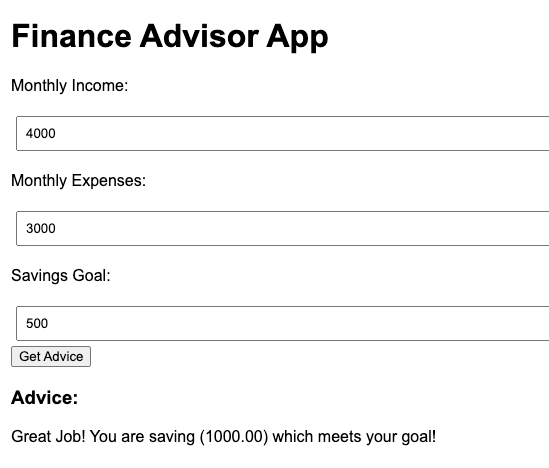
Description:
This advisor takes the user’s monthly income, expenses, and savings goal and provides a simple recommendation on how to improve their finances.
Code.gs
function doGet(e) {
return HtmlService.createHtmlOutputFromFile(‘index’).setTitle(‘Finance Advice’);
}
function adviceFin(income,expenses,goal){
income = parseFloat(income);
expenses = parseFloat(expenses);
const saving = income – expenses;
let advice = “”;
if(saving<goal){
advice = “Your current savings (“+saving.toFixed(2)+”) are below your goal. Reduce your expenses!”
}else{
advice = “Great Job! You are saving (“+saving.toFixed(2)+”) which meets your goal!”
}
return advice;
}
index.html
<!DOCTYPE html>
<html>
<head>
<base target=”_top”>
<style>
body {
font-family: Arial, sans-serif;
padding: 20px;
}
input {
padding: 8px;
margin: 5px;
width: 100%;
}
</style>
</head>
<body>
<h1>Finance Advisor App</h1>
<p>Monthly Income:</p>
<input type=”number” id=”income” placeholder=”e.g., 4000″>
<p>Monthly Expenses:</p>
<input type=”number” id=”expenses” placeholder=”e.g., 3000″>
<p>Savings Goal:</p>
<input type=”number” id=”goal” placeholder=”e.g., 1000″>
<br>
<button>Get Advice</button>
<div id=”result” style=”margin-top:20px;”></div>
<script>
const btn = document.querySelector(‘button’);
btn.addEventListener(‘click’,getAdvice);
function getAdvice(){
const income = document.getElementById(‘income’).value;
const expenses = document.getElementById(‘expenses’).value;
const goal = document.getElementById(‘goal’).value;
google.script.run.withSuccessHandler(function(advice){
document.getElementById(‘result’).innerHTML = “<h3>Advice:</h3><p>”+advice+”</p>”;
}).adviceFin(income,expenses,goal);
}
</script>
</body>
</html>
Explanation:
The user enters their monthly income, expenses, and savings goal. The server‑side function calculates current savings and returns advice based on whether the savings meet the goal.
Smart Recipe Finder

Description:
This project lets users input a comma‑separated list of ingredients. It then compares the input against a hard‑coded recipe dataset and recommends recipes that match the most ingredients.
Code.gs
const recipes = [
{ name: “Pasta Primavera”, ingredients: [“pasta”, “tomato”, “bell pepper”, “zucchini”, “garlic”] },
{ name: “Chicken Salad”, ingredients: [“chicken”, “lettuce”, “tomato”, “cucumber”, “olive oil”] },
{ name: “Veggie Stir-Fry”, ingredients: [“broccoli”, “carrot”, “bell pepper”, “soy sauce”, “garlic”] }
];
function doGet(e) {
return HtmlService.createHtmlOutputFromFile(‘index’)
.setTitle(‘Recipe Finder’);
}
function findRecipes(ingredientList){
const userIngredients = ingredientList.split(“,”).map(function(i) {
return i.trim().toLowerCase();
});
const recommendations = [];
recipes.forEach(function(recipe){
let matchCount = recipe.ingredients.filter(function(ing){
return userIngredients.includes(ing);
}).length;
if(matchCount > 0 ){
recommendations.push({ name: recipe.name, matches: matchCount });
}
})
recommendations.sort(function(a, b) { return b.matches – a.matches; });
return recommendations;
}
index.html
<!DOCTYPE html>
<html>
<head>
<base target=”_top”>
<style>
body { font-family: Arial, sans-serif; padding: 20px; }
input { padding: 8px; width: 100%; }
button { padding: 8px 16px; margin-top: 10px; }
</style>
</head>
<body>
<h1>Smart Recipe Finder</h1>
<p>Enter available ingredients (comma‑separated):</p>
<input type=”text” id=”ingredients” placeholder=”e.g., tomato, garlic, chicken” value=”tomato, garlic, chicken”>
<br>
<button>Find Recipes</button>
<div id=”result” style=”margin-top:20px;”></div>
<script>
const btn = document.querySelector(‘button’);
const result = document.querySelector(‘#result’);
btn.addEventListener(‘click’,getRecipes);
function getRecipes(){
const ingredients = document.getElementById(‘ingredients’).value;
google.script.run.withSuccessHandler(onSuccess).findRecipes(ingredients);
}
function onSuccess(response){
if(response.length === 0 ){
result.innerHTML = ‘Not found’;
return;
};
let html = “<h3>Recommended Recipes:</h3><ul>”;
response.forEach((rec)=>{
html += “<li>” + rec.name + ” (matches: ” + rec.matches + “)</li>”;
})
html += “</ul>”;
result.innerHTML = html;
}
</script>
</body>
</html>
Explanation:
The user enters a list of ingredients. The server‑side function compares these with each recipe’s ingredients and returns recommendations sorted by the number of matching items.
