Content:
In the modern web development landscape, the ability to fetch and display data from a public API is a fundamental skill. It not only enhances the interactivity of web applications but also allows developers to leverage vast amounts of data available online. This tutorial will guide you through the process of fetching data from the JSONPlaceholder, a fake online REST API for testing and prototyping, and displaying it in a list format. Additionally, we’ll implement pagination to navigate through the data.
Getting Started
First, ensure your HTML structure has a div with a class of main. This is where our list and buttons will reside. While this tutorial focuses on JavaScript, having a basic HTML and CSS setup will improve the presentation.
Fetching the Data
Our JavaScript code starts by selecting the .main div and creating elements dynamically. We’re interested in fetching data from JSONPlaceholder’s posts endpoint and displaying it. Here’s an overview of the key parts of our script:
javascriptCopy code
const main = document.querySelector('.main');
const ul = eleMaker('ul', '', main);
const url = 'https://jsonplaceholder.typicode.com/posts';
const btnPrev = eleMaker('button', 'Previous', main);
const btn = eleMaker('button', 'Get Data', main);
const btnNext = eleMaker('button', 'Next', main);
let counter = 0; // For pagination
updateButtons(); // Initialize button states

// Event listeners for our buttons
btnPrev.addEventListener('click', () => {
    if (counter > 0) counter -= 1;
    getOutput();
});
btnNext.addEventListener('click', () => {
    counter += 1;
    getOutput();
});
btn.addEventListener('click', getDataVal);

// Fetch and display data
function getDataVal() {
    fetch(url)
    .then(response => response.json())
    .then(data => {
        updateButtons();
        addtoPage(data);
    });
}

// Helper functions for creating elements and updating UI
Understanding the Functions
- getOutput and getDataVal: These functions fetch data from the API and either display a single item (with pagination) or a list of items, respectively.
- updateButtons: Manages the state of the Previous and Next buttons based on the
countervalue to implement basic pagination. - eleMaker: A utility function to create and append elements to the DOM.
Conclusion
This example demonstrates the power of JavaScript for fetching and displaying data from a public API. By incorporating these techniques into your projects, you can create dynamic, data-driven web applications. Experiment with different APIs and data structures to build your understanding and skills in web development.
Title: How to Fetch and Display API Data with JavaScript – A Beginner’s Guide
Description:
Dive into the world of APIs with our latest tutorial! Learn how to fetch data from a public API and display it in a list on your web page using JavaScript. This video covers everything from setting up your HTML to writing the JavaScript code for fetching and displaying data, including implementing basic pagination. Whether you’re new to web development or looking to brush up on your skills, this tutorial offers a practical approach to working with APIs. Don’t forget to subscribe for more web development tips and tutorials!
Tags: JavaScript, API, fetch data, public API, web development, programming, beginner guide, data display, pagination, JSONPlaceholder
Fetch and Display Data
Objective: Fetch data from a public API and display the results in a list.
const main = document.querySelector(‘.main’);
const ul = eleMaker(‘ul’,”,main);
const url = ‘https://jsonplaceholder.typicode.com/posts’;
const btnPrev = eleMaker(‘button’,’Previous’,main);
const btn = eleMaker(‘button’,’Get Data’,main);
const btnNext = eleMaker(‘button’,’Next’,main);
let counter =0;
updateButtons();
btnPrev.addEventListener(‘click’,()=>{
if(counter > 0) counter=counter -1;
getOutput();
})
btnNext.addEventListener(‘click’,()=>{
counter=counter +1;
getOutput();
})
btn.addEventListener(‘click’,getDataVal);
function getOutput(){
fetch(url)
.then(response => response.json())
.then(data =>{
updateButtons();
const val = data[counter];
const html = `${val.id} <h1>${val.title}</h1>
<div>${val.body}</div> `;
const holder = eleMaker(‘div’,html,main);
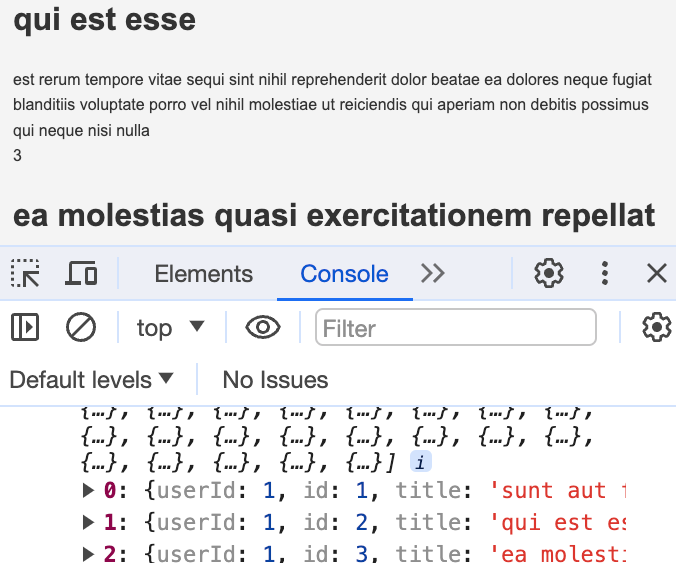
console.log(data[counter]);
})
}
function getDataVal(){
fetch(url)
.then(response => response.json())
.then(data =>{
updateButtons();
addtoPage(data);
})
}
function updateButtons(){
if(counter <= 0){
btnPrev.disabled = true;
}else{
btnPrev.disabled = false;
}
}
function addtoPage(data){
ul.innerHTML = ”;
console.log(data);
data.forEach(item =>{
const temp = eleMaker(‘li’,item.title,ul);
})
}
function eleMaker(tagType,txt,parent){
const temp = document.createElement(tagType);
temp.innerHTML = txt;
return parent.appendChild(temp);
}