
Sample JavaScript Code Laurence Svekis
JavaScript Closure
A closure in JavaScript is a function that has access to the variables in its parent scope, even after the parent function has completed execution. This allows for data to be “closed over” or remembered by the inner function, even after the outer function has returned.
For example:
function makeCounter() {
let count = 0;
return function() {
return count++;
}
}
let counter = makeCounter();
console.log(counter()); // outputs 0
console.log(counter()); // outputs 1
console.log(counter()); // outputs 2
Here, the makeCounter function returns an inner function that has access to the count variable declared in its parent scope, and can “remember” the current count value even after the makeCounter function has completed execution. Each time the inner function is called, it returns the current value of count and increments it by 1.

const a = ‘hello’;
console.log(a);
abc();
function abc(){
//const a = ‘world’;
console.log(a);
}
function myCount(){
let count = 0;
return function(){
return count++;
}
}
function myCount2(){
let count = 0 ;
return count++;
}
let cnt = myCount();
let cnt2 = myCount2;
for(let x=0;x<10;x++){
console.log(cnt());
console.log(cnt2());
}
JavaScript Closure Advanced
In this example, the makeAdder function takes in a single argument x and returns an inner function that takes in a second argument y. The inner function has access to the x variable declared in the parent scope and uses it to add x and y together and return the result.
We can see here that the outer function makeAdder has been executed twice and it returns two different inner functions which are assigned to different variables add5 and add10 and these inner functions are able to remember their respective parent scope values of x.
function makeAdder(x) {
return function(y) {
return x + y;
}
}
let add5 = makeAdder(5);
console.log(add5(3)); // outputs 8
console.log(add5(4)); // outputs 9
let add10 = makeAdder(10);
console.log(add10(5)); // outputs 15
console.log(add10(6)); // outputs 16
const output = document.querySelector(‘#output’);
function adder(val){
return function(val2){
return val + val2;
}
}
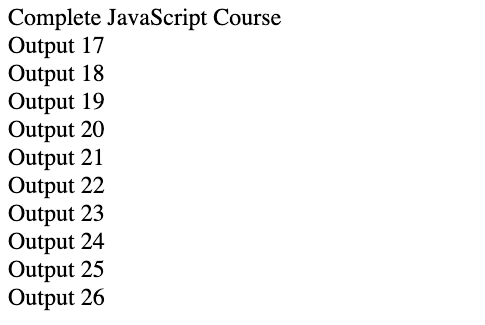
let a1 = adder(15);
console.log(a1(2));
for(let x=0;x<10;x++){
output.innerHTML += `<div>Output ${(a1(2+x))}</div>`;
}
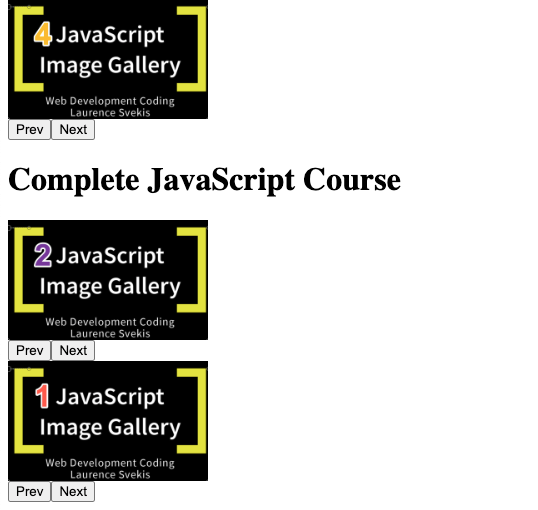
JavaScript Image Gallery and Dynamic Image Gallery using page classes or create page elements on the fly with code
Here is an example of a JavaScript image gallery maker that creates a simple image gallery with prev/next buttons to navigate through the images:
<div id=”gallery”>
<img src=”image1.jpg” id=”current-image”>
<button id=”prev-button”>Prev</button>
<button id=”next-button”>Next</button>
</div>
<script>
var images = [“image1.jpg”, “image2.jpg”, “image3.jpg”, “image4.jpg”];
var currentIndex = 0;
var gallery = document.getElementById(“gallery”);
var currentImage = document.getElementById(“current-image”);
var prevButton = document.getElementById(“prev-button”);
var nextButton = document.getElementById(“next-button”);
prevButton.addEventListener(“click”, function() {
currentIndex–;
if (currentIndex < 0) {
currentIndex = images.length – 1;
}
currentImage.src = images[currentIndex];
});
nextButton.addEventListener(“click”, function() {
currentIndex++;
if (currentIndex >= images.length) {
currentIndex = 0;
}
currentImage.src = images[currentIndex];
});
</script>
This example uses JavaScript to select the elements from the HTML, and add event listeners to the prev/next buttons to navigate through the images in the images array when clicked. The currentIndex variable keeps track of the current image being displayed, and the currentImage.src property is updated to show the next/prev image in the array when the buttons are clicked.
The above code is an example of a JavaScript image gallery maker that creates a simple image gallery with prev/next buttons. The code uses JavaScript to select the necessary elements from the HTML, such as the gallery container, current image, and prev/next buttons. It then adds event listeners to the prev/next buttons, so that when they are clicked, the current image being displayed is updated to the next/prev image in the images array. The currentIndex variable keeps track of the current image being displayed, and it is updated each time the prev/next buttons are clicked. When the current index reaches the end of the images array, it resets to the first image, thus creating an infinite loop.
Dynamic Image Gallery
How to Create an Image Gallery and Dynamic Image Gallery with JavaScript Code
The image gallery can also be used within a function to create multiple image galleries all working independently. Either creating them on the fly within the code or selecting existing elements with the class name and generating images within those elements.
const output = document.querySelector(‘.output’);
const images = [‘one.jpg’,’two.jpg’,’three.jpg’,’four.jpg’];
/*
for(let x=0;x<12;x++){
const el = document.createElement(‘div’);
output.append(el);
cGallery(el);
}
*/
const eles = document.querySelectorAll(‘.gal’);
eles.forEach(el => {
cGallery(el);
})
function cGallery(parentEle){
let curIndex = 0;
const gallery = document.createElement(‘div’);
const curImage = document.createElement(‘img’);
curImage.setAttribute(‘src’,’one.jpg’);
const btn1 = document.createElement(‘button’);
btn1.textContent = ‘Prev’;
const btn2 = document.createElement(‘button’);
btn2.textContent = ‘Next’;
parentEle.append(gallery);
gallery.append(curImage);
gallery.append(btn1);
gallery.append(btn2);
btn1.addEventListener(‘click’,()=>{
curIndex–;
if(curIndex<0){
curIndex = images.length-1;
}
console.log(images[curIndex]);
curImage.src = images[curIndex];
})
btn2.addEventListener(‘click’,()=>{
curIndex++;
if(curIndex >= images.length){
curIndex = 0;
}
console.log(images[curIndex]);
curImage.src = images[curIndex];
})
}
HTTP request in Javascript Get JSON data with xhr method and fetch methods
HTTP request in Javascript?
There are several ways to make an HTTP request in JavaScript, including using the XMLHttpRequest object or the fetch() function.
Here is an example of making an HTTP GET request using XMLHttpRequest:
var xhr = new XMLHttpRequest();
xhr.open(“GET”, “https://example.com”);
xhr.send();
Here’s an example of making an HTTP GET request to a JSON endpoint using the XMLHttpRequest object and parsing the response as JSON:
var xhr = new XMLHttpRequest();
xhr.open(“GET”, “https://example.com/data.json”);
xhr.onload = function() {
if (xhr.status === 200) {
var data = JSON.parse(xhr.responseText);
console.log(data);
} else {
console.error(xhr.statusText);
}
};
xhr.onerror = function() {
console.error(xhr.statusText);
};
xhr.send();
In this example, a new XMLHttpRequest object is created, and then opened with the “GET” method and the specified JSON endpoint URL. The onload event is used to handle the response, and onerror event is used to handle any error. The xhr.status is checked and if it’s 200, it indicates that the request is successful, then we parse the response as JSON and
log the data to the console. If the xhr.status is not 200, it means there’s an error and it logs the error message in the onerror function. If there’s any network error, the onerror function is triggered, and it logs the error message.
Finally the request is sent using the xhr.send() method.
Please note that you should always check the response status code and handle it accordingly. Also, XMLHttpRequest is an old API, and fetch() is more modern and recommended
The fetch() method is a modern JavaScript method that allows you to make HTTP requests, similar to the XMLHttpRequest object. The fetch() method returns a promise that resolves to the response of the request, which can be a Response or Error object.
When you call the fetch() method, you pass in the URL of the endpoint you want to make the request to. You can also pass in an options object as the second parameter, which allows you to configure the request, such as setting the HTTP method, headers, and body.
The fetch() method returns a promise that resolves to the response of the request. Once you have the response, you can use the .json(), .text(), .blob() methods, etc to access the data of the response.
Here’s an example of how you can use the fetch() method:
fetch(“https://example.com/data.json”)
.then(response => response.json())
.then(data => console.log(data))
.catch(error => console.log(error));
In this example, the fetch() method is used to make a GET request to a JSON endpoint. The .then() method is used to handle the response, which is passed as a parameter to the first callback function. The response.json() method is used to parse the response as JSON and the result is passed to the second callback function. Finally, the data is logged to the console. If there’s any error during the request, it will be caught and logged by the catch function.
The fetch() method is a more modern and recommended way to make HTTP requests in JavaScript, it’s more concise and easy to use, and it’s supported in most modern browsers.
And here is an example of making an HTTP GET request using fetch():
fetch(“https://example.com”)
.then(response => response.text())
.then(data => console.log(data))
.catch(error => console.log(error));
The first example uses the XMLHttpRequest object to create a new request, open it with the “GET” method and the specified URL, and then send it. The response to the request can then be handled using the onload or onerror events.
The second example uses the fetch() function to make the same GET request to the specified URL, and then uses the .then() method to handle the response, which is passed as a parameter to the first callback function. The response is transformed to text and then logged in the second callback function. If there’s any error during the request, it will be caught and logged by the catch function.
Here’s an example of making an HTTP GET request to a JSON endpoint using the fetch() function and parsing the response as JSON:
fetch(“https://example.com/data.json”)
.then(response => response.json())
.then(data => console.log(data))
.catch(error => console.log(error));
The fetch() function is used to make the GET request to the specified JSON endpoint. The response.json() method is then used to parse the response as JSON and the result is passed to the first callback function. In the second callback function, the data is logged. If there’s any error during the request, it will be caught and logged by the catch function.
const output = document.querySelector(‘.output’);
const url = ‘https://www.discoveryvip.com/shared/person1000.json’;
const xhr = new XMLHttpRequest();
xhr.open(‘GET’,url);
xhr.onload = function(){
if(xhr.status === 200){
const data = JSON.parse(xhr.responseText);
maker(data);
}else{
console.error(xhr.statusText);
}
}
xhr.onerror = function(){
console.error(xhr.statusText);
}
xhr.send();
output.innerHTML += ‘<hr>’;
fetch(url)
.then(res => res.json())
.then(data => maker(data))
.catch(error => console.log(error));
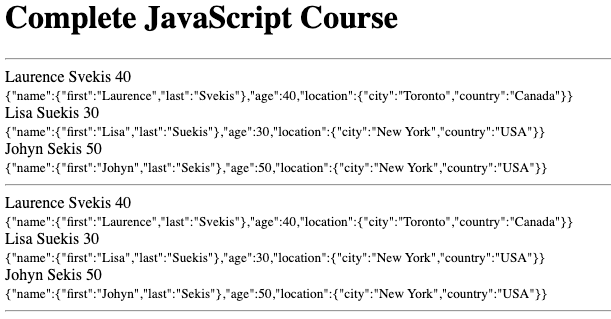
function maker(data){
data.forEach(ele =>{
output.innerHTML += `
<div>${ele.name.first} ${ele.name.last} ${ele.age}</div>
<small>${JSON.stringify(ele)}</small>`;
})
output.innerHTML += ‘<hr>’;
}
JSON Code
[
{
“name”: {
“first”: “Laurence”,
“last”: “Svekis”
},
“age”: 40,
“location”: {
“city”: “Toronto”,
“country”: “Canada”
}
},
{
“name”: {
“first”: “Lisa”,
“last”: “Suekis”
},
“age”: 30,
“location”: {
“city”: “New York”,
“country”: “USA”
}
},
{
“name”: {
“first”: “Johyn”,
“last”: “Sekis”
},
“age”: 50,
“location”: {
“city”: “New York”,
“country”: “USA”
}
}
]
How to add Fade Out and Fade in to page elements pure JavaScript
Learn how to apply fade in and fade out effects to HTML page elements with pure JavaScript code. Select and create new page elements dynamically with code, add event listeners and have the page elements fade in and fade out once the event is triggered.
Adding Fade Effects to new and existing Page Elements
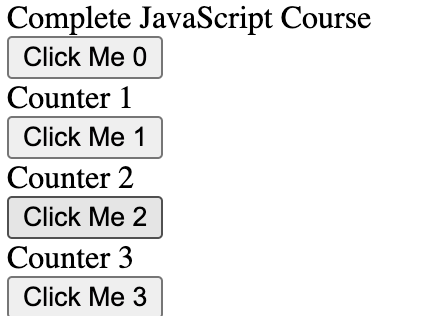
const output = document.querySelector(‘#output’);
for(let x=0;x<5;x++){
const el = document.createElement(‘div’);
output.append(el);
const btn = document.createElement(‘button’);
btn.textContent = `Click Me ${x}`;
el.append(btn);
const div = document.createElement(‘div’);
div.style.transition = ‘opacity 1500ms’;
div.style.opacity = ‘1’;
div.textContent = `Counter ${x+1}`;
el.append(div);
btn.addEventListener(‘click’,()=>{
if(div.style.opacity === ‘1’){
div.style.opacity = ‘0’;
}else{
div.style.opacity = ‘1’;
}
})
}
const fademe = document.querySelectorAll(‘.fader’);
fademe.forEach((ele)=>{
ele.style.transition = ‘opacity 500ms’;
ele.style.opacity = ‘1’;
ele.addEventListener(‘click’,(e)=>{
ele.style.opacity = ‘0’;
})
})
<div id=”output”>Complete JavaScript Course </div>
<div class=”fader”>One</div>
<div class=”fader”>Two</div>
<div class=”fader”>Three</div>
<div class=”fader”>Four</div>
<script src=”app1.js”></script>
How to create page HTML elements with JavaScript code append prepend before after pure JavaScript
How to append and add new page elements with JavaScript
How to append and add new page elements with JavaScript using append, appendChild, prepend, before and after methods to dynamically add and reposition page elements
Create Page elements with Code
How to append and add new page elements with JavaScript

const output = document.querySelector(‘#output’);
const pageBody = document.body;
const el1 = document.createElement(‘h1’);
el1.textContent = ‘Hello World 1’;
console.log(el1);
pageBody.append(el1);
output.append(el1);
const res1 = output.appendChild(el1);
console.log(res1);
res1.textContent = ‘Hello 1’;
el1.textContent = ‘Hello 2’;
output.before(el1);
output.after(el1);
output.prepend(el1);
const ul = document.createElement(‘ul’);
output.append(ul);
for(let i=0;i<10;i++){
const li1 = document.createElement(‘li’);
li1.textContent = `#${i+1}`;
ul.append(li1);
}
Regex Checking for Numbers in the input field
Check for values that match a Regex pattern in the input field. Push a button and apply the match checker to return the results in the console.
/^[0-9]*$/g = Only numbers in the string
/[0-9]+/g = Will return numbers in the result ignore non digits 0-9
/[\D]/g = Every Character other than digits
/\d/g = Digits separated
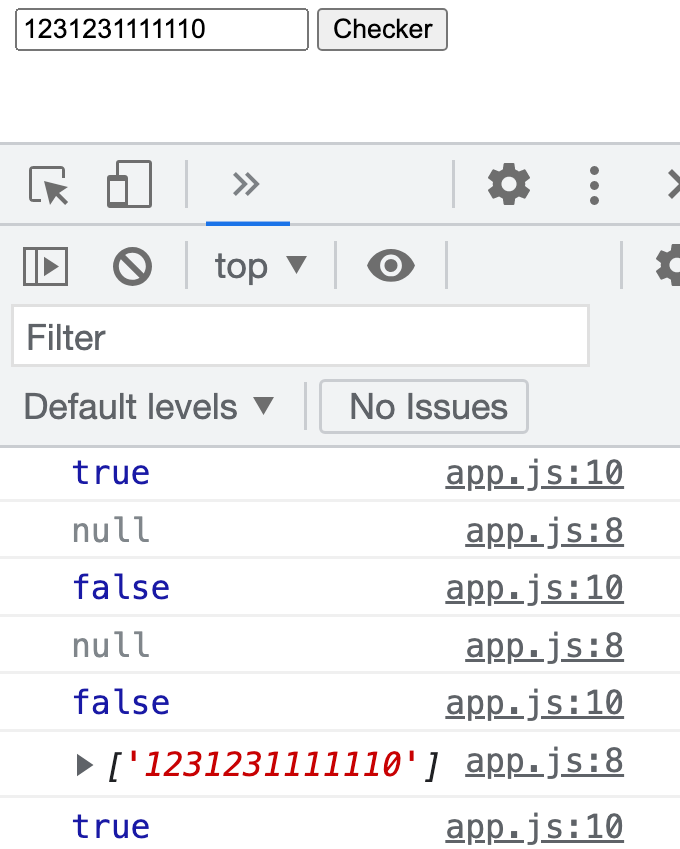
<!DOCTYPE html>
<html>
<head>
<title>JavaScript Course</title>
</head>
<body>
<div>
<input type=”text” id=”nums”>
<button id=”btn”>Checker</button>
</div>
<script src=”app.js”></script>
</body>
</html>
const nums = document.querySelector(‘#nums’);
const btn = document.querySelector(‘#btn’);
btn.onclick = ()=>{
const inputValue = nums.value;
const patt = /^[0-3]*$/g;
const results = inputValue.match(patt);
console.log(results);
const valNum = results != null;
console.log(valNum);
}