Creating presentations from lengthy documents can be a tedious task, especially when you need to transfer key points and sections manually. This blog post will guide you through automating the process using Google Apps Script, enabling you to convert sections of a Google Docs document into a series of slides on a Google Slides presentation.
What You’ll Need
- A Google Docs document formatted with distinct sections, ideally separated by headings.
- Basic familiarity with Google Apps Script.
Step 1: Prepare Your Google Docs Document
Ensure your document is formatted with headings that you want to use as slide titles. Each heading will start a new slide, and the content following each heading until the next heading will be the slide’s content.
Step 2: Open the Script Editor
- Open the Google Docs file.
- Click on “Extensions” > “Apps Script”.
Step 3: Write the Apps Script
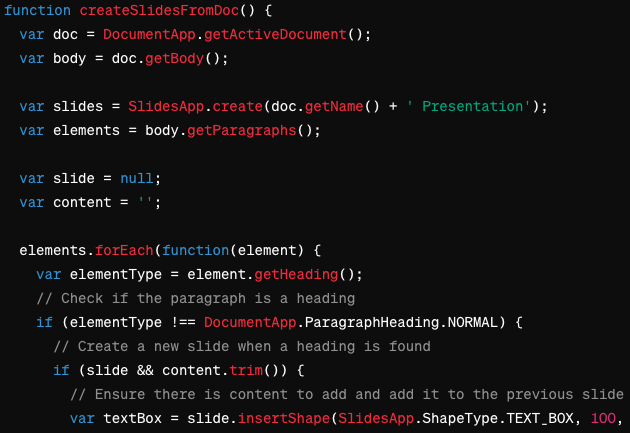
Copy and paste the following script into the script editor:
function createSlidesFromDoc() {
  var doc = DocumentApp.getActiveDocument();
  var body = doc.getBody();

  var slides = SlidesApp.create(doc.getName() + ' Presentation');
  var elements = body.getParagraphs();

  var slide = null;
  var content = '';

  elements.forEach(function(element) {
    var elementType = element.getHeading();
    // Check if the paragraph is a heading
    if (elementType !== DocumentApp.ParagraphHeading.NORMAL) {
      // Create a new slide when a heading is found
      if (slide && content.trim()) {
        // Ensure there is content to add and add it to the previous slide
        var textBox = slide.insertShape(SlidesApp.ShapeType.TEXT_BOX, 100, 100, 600, 300);
        var textRange = textBox.getText();
        textRange.setText(content);
        // Set text style if necessary
        textRange.getTextStyle().setFontSize(14);
      }
      slide = slides.appendSlide(SlidesApp.PredefinedLayout.TITLE_AND_BODY);
      var titleShape = slide.getShapes()[0]; // Assuming the first shape is the title
      titleShape.getText().setText(element.getText());
      content = '';
    } else {
      // Accumulate content until a new heading is found
      content += element.getText() + '\n';
    }
  });

  // Add the last accumulated content to the last slide
  if (slide && content.trim()) {
    var textBox = slide.insertShape(SlidesApp.ShapeType.TEXT_BOX, 100, 100, 600, 300);
    var textRange = textBox.getText();
    textRange.setText(content);
    textRange.getTextStyle().setFontSize(14); // Set the font size
  }
}
Step 4: Save and Run the Script
Save the script with a meaningful name, then click on the run button (►). You might need to authorize the script to interact with your Google documents.
Step 5: Check Your New Presentation
After the script runs, it will create a new Google Slides presentation with the same name as your document followed by “Presentation”. Each section of your document that was under a heading will now appear on its own slide.
Conclusion
This simple automation script can save you a lot of time when converting documents into presentations. It’s especially useful for educators, managers, or anyone who frequently creates presentation materials from extensive documentation.
With Google Apps Script, the possibilities for automating tasks across Google Workspace apps are nearly limitless, allowing you to streamline workflows and increase productivity.