
Learn how browser games work, explore JavaScript game mechanics, and discover how to turn a simple idea into something people can actually play.
Have you ever played a video game and wondered what happens behind the scenes?
How does a character move when you press an arrow key?
How does the game know when you’ve collected an item?
What makes an enemy move across the screen?
And how does the game determine whether you’ve won or lost?
The answers involve some of the most useful concepts in JavaScript programming.
Game development is an excellent way to learn programming because it transforms abstract concepts into visible, interactive results.
Instead of simply reading about variables, functions, loops, and conditional statements, you get to see them working together.
In this guide, we’ll explore the essential building blocks of a simple 2D browser game, including practical code examples and experiments you can try yourself.
By the end, you’ll understand how several important game systems work and how to approach building your own playable project.
1. Understanding the Anatomy of a Browser Game
A browser game doesn’t necessarily require a complicated game engine.
You can create a basic interactive game using three familiar web technologies:
HTML provides the structure and the drawing surface.
CSS controls the appearance of the page and surrounding interface.
JavaScript manages the game logic, movement, collisions, scoring, and interactions.
One particularly useful HTML element for games is <canvas>.
The Canvas API lets JavaScript draw shapes, images, text, and animations directly onto a webpage.
Your first game canvas
Start with this simple HTML:
<canvas id="game" width="600" height="400"></canvas>Now connect JavaScript to the canvas:
const canvas = document.getElementById("game");
const ctx = canvas.getContext("2d");

ctx.fillStyle = "blue";
ctx.fillRect(50, 50, 40, 40);
What happens?
JavaScript draws a blue rectangle on the canvas.
The four values passed to fillRect() represent:
- X position: 50
- Y position: 50
- Width: 40
- Height: 40
This simple example introduces one of the most important ideas in game development.
Every visible object needs a position, a size, and a way to be drawn.
A player, enemy, collectible, or obstacle can all begin as simple shapes.
You don’t need advanced graphics to understand how a game works.
2. Creating a Player That Can Move
Once you can draw an object, the next step is making it interactive.
Let’s create a player object.
const player = {
  x: 100,
  y: 100,
  size: 30,
  speed: 5
};
This object stores information about our player.
The x and y properties define the position.
The size property controls its dimensions.
The speed property determines how far the player moves during each update.
Now we can listen for keyboard input.
document.addEventListener("keydown", (event) => {
  if (event.key === "ArrowRight") {
    player.x += player.speed;
  }

  if (event.key === "ArrowLeft") {
    player.x -= player.speed;
  }

  if (event.key === "ArrowUp") {
    player.y -= player.speed;
  }

  if (event.key === "ArrowDown") {
    player.y += player.speed;
  }
});
Notice something interesting.
Moving right increases the X coordinate.
Moving left decreases it.
Moving down increases the Y coordinate.
Moving up decreases it.
That’s because the Canvas coordinate system begins at the upper-left corner.
Why this matters
Understanding coordinates is essential for:
- Character movement
- Enemy positioning
- Collectible placement
- Collision detection
- Camera systems
- Level design
Practice challenge
Modify the player’s speed from 5 to 10.
What changes?
Now reduce it to 2.
Which version feels easier to control?
This introduces an important game design principle:
Changing a single variable can dramatically affect the player’s experience.
3. Understanding the Game Loop
A game needs to update continuously.
It must repeatedly check what is happening, update positions, and redraw the screen.
This repeating process is called the game loop.
A simple game loop might look like this:
function gameLoop() {
  update();
  draw();

  requestAnimationFrame(gameLoop);
}
The update() function changes the game’s state.
The draw() function renders that state.
The browser’s requestAnimationFrame() schedules the next visual update.
Why not just use a regular loop?
You might wonder why we don’t use:
while (true) {
  update();
  draw();
}
A continuous synchronous loop would block the browser’s main thread, preventing normal rendering and interaction.
requestAnimationFrame() allows the browser to coordinate animation with its rendering process.
Making movement smoother
A common beginner mistake is moving objects by a fixed amount every frame.
For example:
player.x += 5;The problem is that different devices may render different numbers of frames per second.
A better approach uses elapsed time.
function update(deltaTime) {
  player.x += player.speed * deltaTime;
}
Here, player.speed can represent pixels per second, and deltaTime is the elapsed time in seconds.
For example:
If the player’s speed is 120 pixels per second and deltaTime is 0.016 seconds:
120 × 0.016 = 1.92 pixels
This makes movement less dependent on the device’s frame rate.
In a complete game, elapsed time should be calculated from animation timestamps, with unusually large gaps handled appropriately.
Key lesson: The game loop is the heartbeat of your game. It keeps the world updating and responding to the player.
4. Collision Detection: How Games Know When Objects Touch
Collision detection is one of the most interesting programming concepts in game development.
Imagine a game where the player must collect crystals while avoiding moving hazards.
The game needs to answer two questions:
- Has the player touched a crystal?
- Has the player collided with a hazard?
These questions can be answered using geometry.
Rectangle collision detection
For rectangular objects, a common technique is Axis-Aligned Bounding Box collision detection, or AABB.
Here’s a simple implementation:
function isColliding(a, b) {
  return (
    a.x < b.x + b.width &&
    a.x + a.width > b.x &&
    a.y < b.y + b.height &&
    a.y + a.height > b.y
  );
}
This checks whether two rectangles overlap horizontally and vertically.
If all four conditions are true, the rectangles overlap.
Example
const player = {
  x: 50,
  y: 50,
  width: 30,
  height: 30
};

const crystal = {
  x: 65,
  y: 65,
  width: 15,
  height: 15
};

console.log(isColliding(player, crystal));
// true
The player and crystal occupy overlapping areas.
The game can use that result to award points, remove the crystal, or trigger an animation.
Circle collision detection
For circular objects, a different approach is often easier.
Two circles overlap when the distance between their centers is smaller than the sum of their radii.
function circlesCollide(a, b) {
  const dx = a.x - b.x;
  const dy = a.y - b.y;

  const distance = Math.hypot(dx, dy);

  return distance < a.radius + b.radius;
}
This is a practical application of the Pythagorean theorem.
It also demonstrates how mathematics becomes useful in programming.
Try this experiment
Imagine two circles with radii of 15 pixels each.
Their combined radius is 30 pixels.
What happens when their centers are:
- 40 pixels apart?
- 25 pixels apart?
- Exactly 30 pixels apart?
With the strict less-than comparison used above, only the second case counts as a collision.
This distinction matters when designing accurate collision rules.
5. Building a Collectible System
Collecting items is a simple but effective way to introduce game objectives.
Let’s create a crystal.
const crystal = {
  x: 200,
  y: 150,
  radius: 10,
  collected: false
};
Now create a score variable.
let score = 0;When the player touches the crystal, update the score.
if (
  !crystal.collected &&
  circlesCollide(player, crystal)
) {
  crystal.collected = true;
  score += 10;
}
This example assumes the player also has a center position and radius.
Notice the collected property.
Without it, the game might repeatedly award points while the player remains in contact with the crystal.
This introduces the concept of state management.
What is game state?
Game state is the collection of information describing what is currently happening.
Examples include:
- Player position
- Current score
- Remaining lives
- Collected items
- Enemy positions
- Time remaining
- Whether the game is running, paused, won, or lost
A game is essentially a system that updates this information in response to time and player actions.
6. Making a Game Challenging Without Making It Frustrating
A game can be technically functional but still not enjoyable.
That’s because programming and game design are related but different disciplines.
Programming determines what the game can do.
Game design determines how the experience feels.
Consider a simple game where players collect crystals and avoid moving obstacles.
If the obstacles barely move, the game may become boring.
If they move too quickly, the game may feel unfair.
Finding the right balance requires experimentation.
Four variables that affect difficulty
| Variable | Lower setting | Higher setting |
|---|---|---|
| Player speed | Slower navigation | Faster movement |
| Hazard speed | Easier to avoid | More demanding timing |
| Starting lives | Less room for mistakes | More opportunities to retry |
| Time limit | Less time pressure | More time available |
For starting lives and time limits, the effects depend on how the setting is defined. Fewer lives and shorter time limits generally increase difficulty.
The one-variable experiment
When testing game difficulty, change only one setting at a time.
For example:
Test A: Player speed = 100 pixels/second
Test B: Player speed = 150 pixels/second
Keep every other setting identical.
Play both versions.
Ask yourself:
- Which version feels more responsive?
- Which makes obstacles easier to avoid?
- Does faster movement reduce the challenge too much?
- Which version would be more enjoyable for a beginner?
This approach is useful because it helps identify which design decisions are responsible for changes in the experience.
It’s also a practical introduction to controlled experimentation.
7. Designing Levels That Encourage Interesting Decisions
A level is more than a collection of walls and obstacles.
A good level creates meaningful decisions.
Imagine a player standing at the beginning of a maze.
One path is short but contains moving hazards.
Another path is longer but safer.
Which should the player choose?
That decision creates gameplay.
Three principles of effective level design
1. Clarity
Players should understand their objective.
If the goal is to collect crystals and reach an exit, the visual design should make those elements recognizable.
2. Challenge
The level should require attention, timing, planning, or problem-solving.
But it should not depend on confusing or unpredictable rules.
3. Progression
Introduce simple challenges before combining them into more complicated situations.
For example:
- Level 1: Learn to move.
- Level 2: Collect an item.
- Level 3: Navigate around walls.
- Level 4: Avoid a moving hazard.
- Level 5: Combine collecting, navigation, and timing.
This approach helps players develop skills gradually.
Practical level design challenge
Sketch a small level using a grid.
Use these symbols:
##########
#P...C...#
#..##....#
#....H...#
#..C...E.#
##########
Where:
#represents a wallPrepresents the playerCrepresents a collectibleHrepresents a hazardErepresents the exit.represents open space
Now ask yourself:
Can the player reach every collectible?
Is there a valid route to the exit?
Does the hazard create an interesting decision?
Could the player become trapped?
Even a simple grid reveals important design considerations.
8. Playtesting: Why Your First Version Is Rarely Your Best
Building a working game is an achievement.
But a working game isn’t necessarily a good game.
Playtesting helps identify problems that aren’t obvious while writing code.
For example:
A level might be technically possible to complete but require extremely precise timing.
An obstacle might appear harmless but create an unavoidable collision.
A player might not understand why the game ended.
These are design problems that become clearer through testing.
A practical playtesting method
Use this four-step process.
Step 1: Define a question
Example: “Can a beginner complete the level without losing all their lives?”
Step 2: Test the current version
Play the game using the existing settings.
Step 3: Record observations
Note what happened.
Did the player get stuck?
Were the hazards too fast?
Was the objective obvious?
Step 4: Make one improvement
Change a setting or level element, then test again.
Example playtest log
| Test | Observation | Next change |
|---|---|---|
| 1 | Hazards move too quickly | Reduce hazard speed |
| 2 | Player can bypass most challenges | Adjust wall placement |
| 3 | Exit is difficult to identify | Improve visual contrast |
| 4 | Game feels too easy | Add a new hazard pattern |
Over several tests, these observations can guide improvements.
The important lesson is that game development is iterative.
Build → Test → Observe → Improve → Repeat
9. A Beginner-Friendly Game Development Roadmap
If you’re completely new to game development, you don’t need to learn everything at once.
A structured approach makes the process more manageable.
Stage 1: Draw something
Learn how Canvas works and display a simple shape.
Stage 2: Make it move
Use JavaScript variables and keyboard events to control position.
Stage 3: Create the game loop
Update and redraw objects continuously.
Stage 4: Add boundaries
Prevent the player from moving outside the game area or through walls.
Stage 5: Introduce interactions
Detect collisions with collectibles, hazards, and other objects.
Stage 6: Create objectives
Add scoring, lives, win conditions, and losing conditions.
Stage 7: Design a level
Arrange obstacles and collectibles to create an interesting challenge.
Stage 8: Playtest and improve
Adjust the game based on observations.
This progression is useful because every stage builds on the previous one.
You aren’t trying to create a complicated game immediately.
You’re developing a series of small, understandable systems.
10. Put Everything into Practice with Game Creation Lab
Now that you understand some of the essential concepts behind browser games, it’s time to explore how these systems work together.
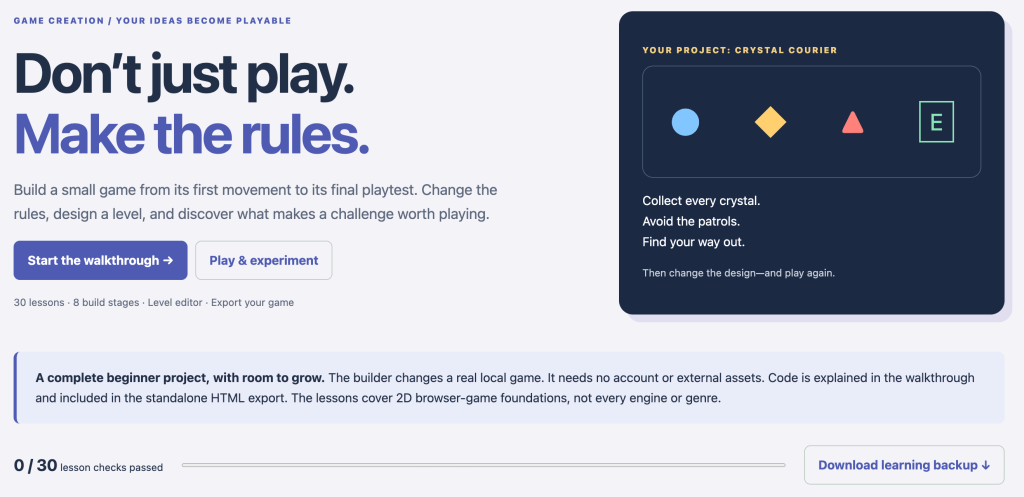
I’ve created Game Creation Lab, a free interactive learning resource on DiscoveryVIP designed to help beginners explore game development through guided experiments and a playable project.
Instead of only reading about programming concepts, you can interact with a working game, change its behavior, design levels, and investigate how the underlying systems operate.
Meet Crystal Courier
The learning project centers on a small browser game called Crystal Courier.
Your objective is straightforward:
Collect every crystal, avoid moving patrols, and reach the exit.
But the real learning happens when you begin changing the game.
What you’ll find inside Game Creation Lab
30 guided lessons
Explore foundational game development concepts through explanations, examples, and activities.
8 progressive build stages
Follow the development of a single game as new systems are introduced.
Playable game prototype
Experiment with player movement, hazards, collectibles, and game objectives.
Game customization controls
Adjust player speed, hazard speed, starting lives, and time limits to investigate how each variable changes gameplay.
Visual level editor
Design your own challenges by placing elements on a grid and testing the resulting level.
Interactive collision explorer
Investigate circle collision detection by changing positions and radii and examining the numerical results.
Game design lessons
Explore ideas such as fairness, movement, feedback, and the decisions that make games engaging.
Playtesting notebook
Record questions, observations, and improvements as you refine your design.
Standalone HTML game export
Download a playable version of your game containing your current level and valid settings. You can also inspect the complete game’s source code.
The resource focuses on foundational 2D browser-game concepts rather than teaching every game engine or genre.
11. Five Experiments to Try in Game Creation Lab
Here are five practical challenges to help you get more value from the resource.
Experiment 1: Investigate movement
Open the playable prototype.
Change the player’s speed.
Play the same level using different settings.
Observe how movement speed affects navigation and difficulty.
What you’ll learn: How variables influence player controls and game balance.
Experiment 2: Explore collision detection
Open the collision explorer.
Move the circles closer together and farther apart.
Change their radii.
Observe when the collision result changes.
What you’ll learn: How distance calculations determine interactions between circular objects.
Experiment 3: Design a level
Open the level designer.
Create a layout with walls, collectibles, and an exit.
Test whether the player can reach the objective.
Modify the design to make the challenge more interesting.
What you’ll learn: How spatial design influences navigation and player decisions.
Experiment 4: Balance difficulty
Start with the default game settings.
Increase hazard speed.
Play the level and record the result.
Then restore hazard speed and adjust the time limit.
Compare the two experiences.
What you’ll learn: How different game mechanics influence difficulty.
Experiment 5: Export and examine your game
Complete your design and export the playable HTML game.
Open the file in your browser.
Inspect its JavaScript source.
Look for the code responsible for movement, collision detection, rendering, and game state.
What you’ll learn: How multiple JavaScript systems combine to produce a complete interactive application.
Start Building Your First Game
<escape>🎮</escape> Game Creation Lab — Learn, Build & Play
Explore the guided walkthrough, experiment with game mechanics, design your own levels, and discover how JavaScript turns simple rules into interactive experiences.
Open the free Game Creation Lab:
https://discoveryvip.com/game-creation-lab/#walkthrough
No account or external game assets are required for the local browser project.
You can also download the 30-lesson handbook from the resource.
Final Thoughts: Learning Programming Through Creation
One of the biggest challenges in learning programming is understanding how individual concepts connect.
You might understand variables, functions, conditions, and loops separately.
But when you build a game, those concepts suddenly have a purpose.
Variables track the player’s position.
Functions organize the game’s behavior.
Conditions determine what happens when objects collide.
Loops and animation callbacks keep the game running.
Objects organize the information that describes the game world.
And testing helps you discover what works and what needs improvement.
This is why game development is such a valuable learning experience.
You’re not just learning how to write code. You’re learning how to design systems, solve problems, test ideas, and create something interactive.
That philosophy connects closely with the Vibe Learning approach: explore a concept, understand it, practice it, receive feedback, reflect, and create something meaningful.
You don’t need to build the next blockbuster game to become a better developer.
Start with one shape.
Make it move.
Give it a goal.
Create a challenge.
Then keep improving.
Your first playable game might be simpler than you imagined — and far more educational than you expected.
Explore More Learning Resources
Game Creation Lab:
https://discoveryvip.com/game-creation-lab/#walkthrough
DiscoveryVIP:
https://discoveryvip.com/
Vibe Learning:
https://vibelearning.ca/
By Laurence Lars Svekis — Web developer, educator, author, Google Developer Expert, and creator of the Vibe Learning Framework. Laurence has taught more than 3 million students through online courses and educational resources.
Join the Discussion
If you were going to build your first JavaScript game, what would you create?
A puzzle game, a platformer, a strategy game, or something completely original?
Share your ideas!
#JavaScript #GameDevelopment #LearnToCode #WebDevelopment #HTML5Canvas #GameDesign #JavaScriptTutorial #CodingForBeginners #GameProgramming #BrowserGames #CreativeCoding #InteractiveLearning #VibeCoding #VibeLearning #LearningByDoing #ProgrammingEducation #DiscoveryVIP #LaurenceSvekis